VGA Passthrough with OVMF+VFIO on Ubuntu 16.04
After many months of research and reading through various articles detailing VGA passthrough builds (such as here, here, and here), I finally decided to upgrade my machine— with PCI passthrough being a primary objective of the new build. I have never liked dual-booting, and using Windows as my primary OS is not really an option, as far as I'm concerned. My major issue now is that I need a bigger desk to stick more monitors on ;)
This write-up details my experience in setting up a Windows 10 guest to run on an Ubuntu 16.04 host. I have used libvirt to manage things, and instructions for using virt-manager to perform most tasks have been provided (some configuration, such as CPU pinning or using raw block storage, is not possible via virt-manager). There are a lot of places where things can go wrong, and I'll try to point those out. This should not be considered an exhaustive guide— I've provided links to additional resources at the end of this document in case you get stuck, or have needs that differed from mine.
Requirements
- CPU must support virtualization extensions (VT-x for Intel)
- CPU must support Directed I/O (VT-d for Intel, generically known as IOMMU)
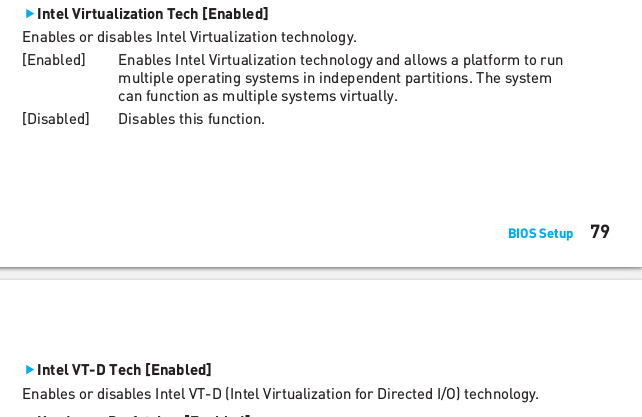
- Motherboard must support VT-x and VT-d (or AMD equivalents). When buying new hardware, check the motherboard's User Manual, which can typically be found on the product page on the manufacturer's website. Example from the PDF manual for my motherboard, which I checked before purchasing.
Setup recommendations
- Kernel should be 4.1 or newer; otherwise you may need to apply various workarounds. vfio-pci is natively supported in 4.1.
- Your host operating system should be installed in UEFI mode, and your machine set to boot via UEFI
- The graphics card you plan to passthrough should have a UEFI or Hybrid BIOS
- Your CPU should fully support ACS if you don't want to worry about IOMMU groupings. If you have a CPU that does not fully support ACS and your IOMMU groupings are less than ideal, workarounds can be done. Intel CPUs with full ACS support. With my CPU and X99A mainboard combo, every single PCI device is inside of its own IOMMU group, without the need for quirks/patches. Many people have setup VGA passthrough without full ACS support-- but having it means one less thing to worry about.
- Two sets of keyboard/mice, or a KVM switch. Once your OS is installed, you'll need to passthrough a mouse and keyboard, which will then be unusable by the guest. After initial setup, you can use something like Synergy if you plan to use both the guest and host simultaneously. Otherwise a KVM switch (or a USB switch) might be a good/simple option.
- The graphics card you're passing through should NOT be the card initialized during boot. In my setup, slot PCIE_1 is the primary 16x/16x slot-- my host's graphics card is connected to this slot, which is used during boot. The guest's card is connected to PCIE_5 (16x/8x)
- Should have two or more discrete PCIe graphics cards. Although using Intel IGD for your host is possible, it is more difficult and error-prone to get working.
My Setup
Software
- Xubuntu 16.04 (64-bit UEFI)
- Linux kernel 4.4.0-59
- QEMU 2.5.0
- libvirt 1.3.1
- virt-manager 1.3.2
Hardware
- CPU: Intel Core i7-6800K Broadwell-E (6 cores/12 threads, 3.4 GHz, LGA 2011-v3, 140W TDP) [ARK]
- Motherboard: MSI X99A XPOWER GAMING TITANIUM (LGA2011-3, Intel X99A Chipset) [Mfg link]
- Memory: Corsair Vengeance LPX 32GB kit (4x8GB DDR4 2133/3200) [Mfg link]
- GPU 1 (host/boot, slot PCIE_1): NVIDIA GeForce GTX 770 (4GB GDDR4, GK104, Rev a1) [Mfg link]
- GPU 2 (guest, slot PCIE_5): XFX Radeon GTR RX 480 (1338MHz, 8GB GDDR5, "Hardswap Fan Black Edition") [Mfg link]
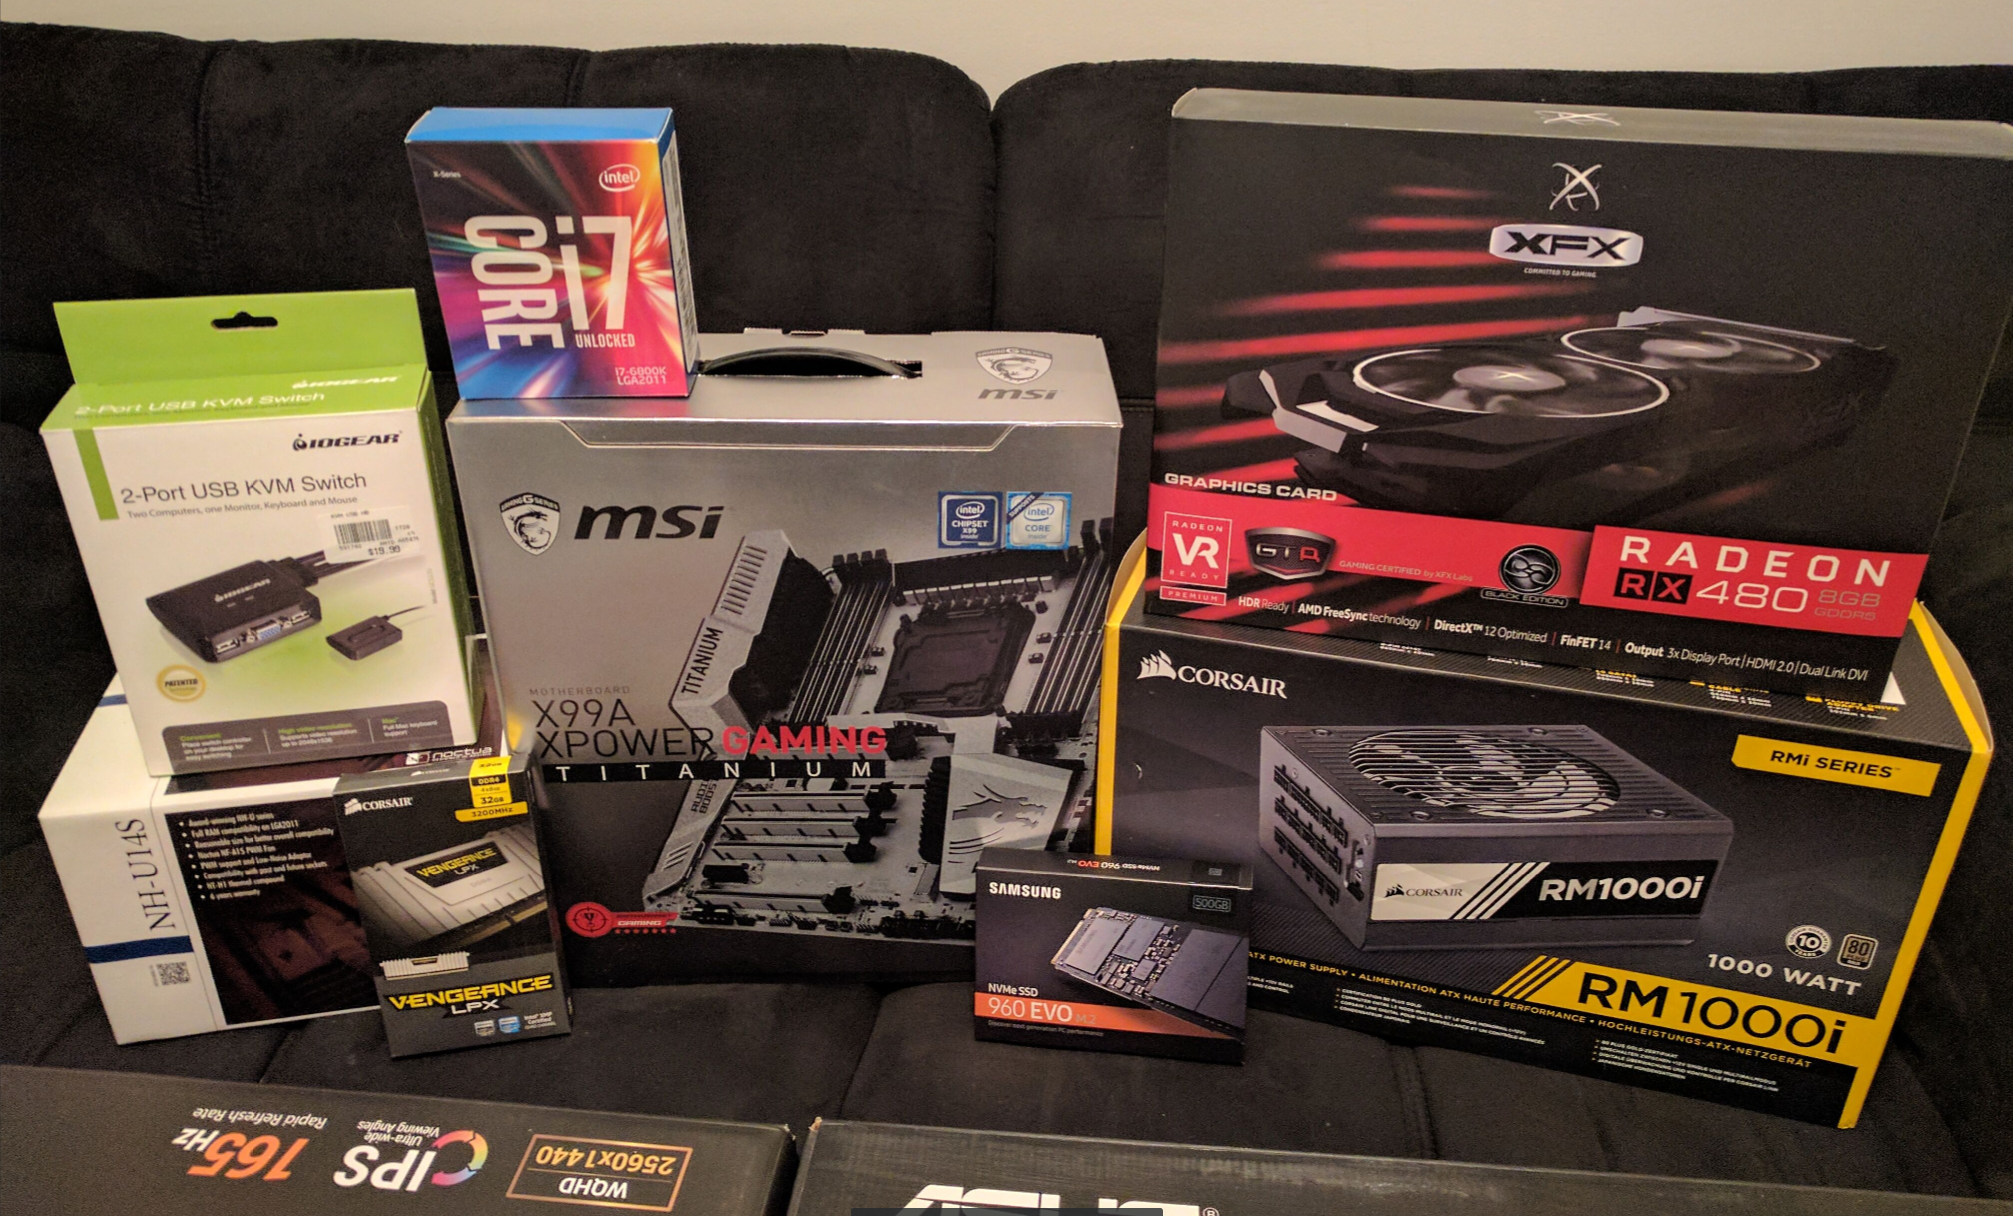 New hardware for my VGA passthrough build
Initial Host Setup
UEFI Check
To ensure that your host has booted via UEFI, check dmesg for EFI-related messages. It is also possible to confirm by checking that /sys/firmware/efi/efivars is populated.
dmesg | grep -i efi
Install required packages
First, we need to install KVM, libvirt, and OVMF
sudo apt-get update
sudo apt-get install qemu-kvm qemu-utils qemu-efi ovmf libvirt-bin libvirt-dev libvirt0 virt-manager
Update modules list
Open up /etc/modules and append the following:
pci_stub
vfio
vfio_iommu_type1
vfio_pci
vfio_virqfd
kvm
kvm_intel
Enable IOMMU
Now, we need to enable IOMMU support in the kernel at boot-time. To do this with GRUB, edit /etc/default/grub and append intel_iommu=on to the GRUB_CMDLINE_LINUX_DEFAULT option. On a stock install of Ubuntu 16.04, this then becomes:
GRUB_CMDLINE_LINUX_DEFAULT="quiet splash intel_iommu=on"
Now update GRUB:
sudo update-grub
Reboot & Check-up
Reboot your machine. This will allow the kernel to boot with IOMMU enabled, and will also load our vfio and pci-stub modules we defined previously.
To ensure IOMMU has been enabled, check for the string Directed I/O, which will be prefixed with either DMAR or PCI-DMA.
~$ dmesg | grep -i 'Directed I/O'
[    0.750152] DMAR: Intel(R) Virtualization Technology for Directed I/O
Determine PCI IDs
If you haven't done so already, you need to determine the PCI device IDs and bus location of the device(s) you want to passthrough. For modern video cards with HDMI audio, you'll also want to passthrough the audio device, which typically has the same location, but different function (BUS:SLOT.FUNC is the location format-- 03.00.1 is bus 3, slot 0, function 1).
To find video cards and their HDMI audio buddies:
lspci -nn | grep -A1 VGA
On my machine, I get:
03:00.0 VGA compatible controller [0300]: Advanced Micro Devices, Inc. [AMD/ATI] Device [1002:67df] (rev c7)
03:00.1 Audio device [0403]: Advanced Micro Devices, Inc. [AMD/ATI] Device [1002:aaf0]
04:00.0 VGA compatible controller [0300]: NVIDIA Corporation GK104 [GeForce GTX 770] [10de:1184] (rev a1)
04:00.1 Audio device [0403]: NVIDIA Corporation GK104 HDMI Audio Controller [10de:0e0a] (rev a1)
Since I want to passthrough the AMD card, I will make note of the PCI VID/PIDs: 1002:67df and 1002:aaf0 for the VGA and Audio device, respectively (VID:PID is the format; in this case 1002:67df has a vendor ID of 0x1002 and product ID of 0x67df). We also need to remember the location, which we will use to determine IOMMU groupings. In the example above: 03:00.0 and 03:00.1 are my locations.
Check IOMMU Groupings
Next up is to determine if the device(s) you want to passthrough are in isolated groups (eg. the groups do not overlap with other devices that you want to leave delegated to the host).
Listing the contents of all IOMMU groups:
find /sys/kernel/iommu_groups/*/devices/*
You can also check this ugly one-liner I wrote that will inject the IOMMU group number into the lspci output:
for dp in $(find /sys/kernel/iommu_groups/*/devices/*); do ploc=$(basename $dp | sed 's/0000://'); igrp=$(echo $dp | awk -F/ '{print $5}'); dinfo=$(lspci -nn | grep -E "^$ploc"); echo "[IOMMU $igrp] $dinfo" ; done
In my example, I have determined that my AMD card (and its audio device) are both in group 31. Furthermore, these are the only devices in group 31. This means we should have no problems passing it through with vfio-pci.
[IOMMU 31] 03:00.0 VGA compatible controller [0300]: Advanced Micro Devices, Inc. [AMD/ATI] Device [1002:67df] (rev c7)
[IOMMU 31] 03:00.1 Audio device [0403]: Advanced Micro Devices, Inc. [AMD/ATI] Device [1002:aaf0]
Stubbing with pci-stub
Now that we've confirmed the IOMMU grouping and have the required info, we can set up pci-stub to claim these devices at boot. This prevents the host from assigning a kernel driver to them.
Open up /etc/initramfs-tools/modules, then add the ID(s) of your devices that should be reserved by pci-stub:
pci_stub ids=VID:PID,VID:PID,...
On my machine, this has the PCI VID/PIDs for the AMD VGA and Audio devices:
pci_stub ids=1002:67df,1002:aaf0
Important note: If you have other PCI devices that share the same VID/PID (eg. two identical graphics cards), and you plan to delegate one to the host, and the other to the guest-- then this method won't work. Check Alex's
vfio-pci-override-vga.shscript at http://vfio.blogspot.co.uk/2015/05/vfio-gpu-how-to-series-part-3-host.html or usexen-pcibackinstead, which uses bus/location IDs rather than vendor IDs.
Now we need to rebuild the initrd image:
update-initramfs -u
Once this has completed, reboot.
Once the machine has restarted, check dmesg to ensure that pci-stub has claimed the devices correctly:
~$ dmesg | grep pci-stub
[    2.151798] pci-stub: add 1002:67DF sub=FFFFFFFF:FFFFFFFF cls=00000000/00000000
[    2.151815] pci-stub 0000:03:00.0: claimed by stub
[    2.151819] pci-stub: add 1002:AAF0 sub=FFFFFFFF:FFFFFFFF cls=00000000/00000000
[    2.151827] pci-stub 0000:03:00.1: claimed by stub
Above, we can see that both 03:00.0 (AMD VGA) and 03:00.1 (AMD Audio) were successfully reserved by pci-stub for our future guest VM.
Network Prep
If you don't plan on passing through a network device to your virtual machine, then configuring a suitable bridge on the host is required to achieve a networking configuration where the guest and host can communicate. Although macvtap is probably the simplest, no-setup option, it has a major disadvantage-- your guest will be unable to communicate with the host. Instead, we'll create a bridge on the host and use the virtio network interface for best performance.
Add the following to the bottom of your /etc/sysctl.conf file:
# Enable IPv4 forwarding
net.ipv4.ip_forward=1
net.ipv4.conf.all.rp_filter=1
net.ipv4.icmp_echo_ignore_broadcasts=1
net.ipv4.conf.default.proxy_arp=1

# Enable IPv6 forwarding & IPv6 Autoconfiguration (optional)
net.ipv6.conf.all.autoconf = 0
net.ipv6.conf.all.accept_ra = 0
net.ipv6.conf.all.forwarding=1
net.ipv6.conf.all.proxy_ndp=1
If you're using NetworkManager (enabled by default in Ubuntu Desktop installations), you'll want to ensure the following setting is present in /etc/NetworkManager/NetworkManager.conf. This instructs NetworkManager to ignore any interface that we have explicitly configured in /etc/network/interfaces, but still allows us to use NetworkManager for WiFi, Bluetooth, and VPN configuration.
[ifupdown]
managed=false
Below is a sample network configuration file (/etc/network/interfaces), where the primary interface (in this example, eno1 -- change this to match your chosen interface) is a part of the vbr0 bridge.
auto lo
iface lo inet loopback

auto  eno1
iface eno1 inet manual
iface eno1 inet6 manual

auto vbr0
iface vbr0 inet static
  address YOUR_IPV4_ADDRESS
  netmask YOUR_IPV4_NETMASK
  gateway YOUR_IPV4_GATEWAY

  bridge_ports eno1
  bridge_stp off
  bridge_waitport 0
  bridge_fd 0

iface vbr0 inet6 static
  address YOUR_IPV6_ADDRESS
  netmask 64
  gateway YOUR_IPV6_GATEWAY

  bridge_ports eno1
  bridge_stp off
  bridge_waitport 0
  bridge_fd 0
Finally, create the new bridge and add the primary interface to it. Once you do this, you will lose network connectivity until you reboot your machine or restart networking. Remember to change eno1 to match your interface.
brctl addbr vbr0
brctl addif vbr0 eno1
Once complete, reboot.
Guest VM Setup
VM Creation & Initial Configuration
During OS installation, there is no need to passthrough the GPU. Instead, we'll use Spice (or VNC) for ease of use.
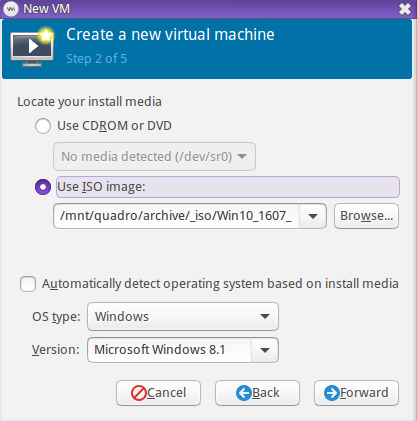
This part can be done in virt-manager-- create a new VM, choose your OS (in my case, I installed Windows 10 Pro), select the installation ISO, then set up your storage. In my case, since I wanted to passthrough an entire physical SSD to my VM, this wasn't possible to setup via the virt-manager GUI (although, it's possible I just didn't have the patience to figure it out). If you plan to do this (or some other non-pool storage scenario), choose No Storage during the creation wizard. We can edit the XML later.
As mentioned above in the Network Prep section, it is recommended that you configure and use a bridge on the host machine if you want to be able to communicate with the host from the guest. In the setup wizard, choose the bridge you created (in my case, I named the bridge jobr0). Also be sure to tick the box "Customize configuration before install".
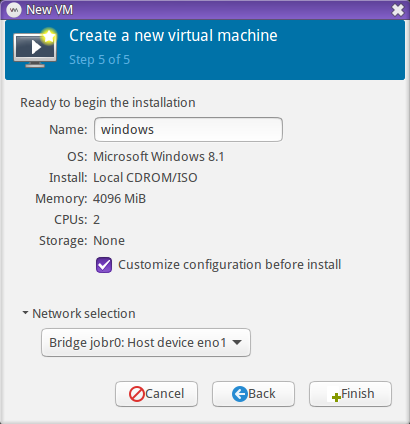
To complete our VM configuration:
- In the Overview section, make sure to change Firmware to UEFI x86_64: /usr/share/OVMF/OVMF_CODE.fd -- the path to the OVMF ROM may differ slightly depending on your installation. (This part is important! If you don't have this option in virt-manager, then you'll need to manually edit the XML prior to install)
- In the CPUs section, set the model to host-passthrough (you will need to enter it manually). More info on host-passthrough and CPU model configuration. Adjust the number of cores you want to allocate to the guest, if you haven't done so already.
- In the Boot Options section, tick the box for IDE CDROM1 to set it as the primary boot device.
- If you're using any VirtIO devices, click Add Hardware and add another IDE CDROM drive, then attach the VirtIO iso to it. This is required to be able to install Windows on a VirtIO disk! See the note below this list for a link to download the iso.
- In the NIC section, change the Device model to virtio. If you have a specific need, you can set the MAC address here as well. Otherwise you can leave it as the default.
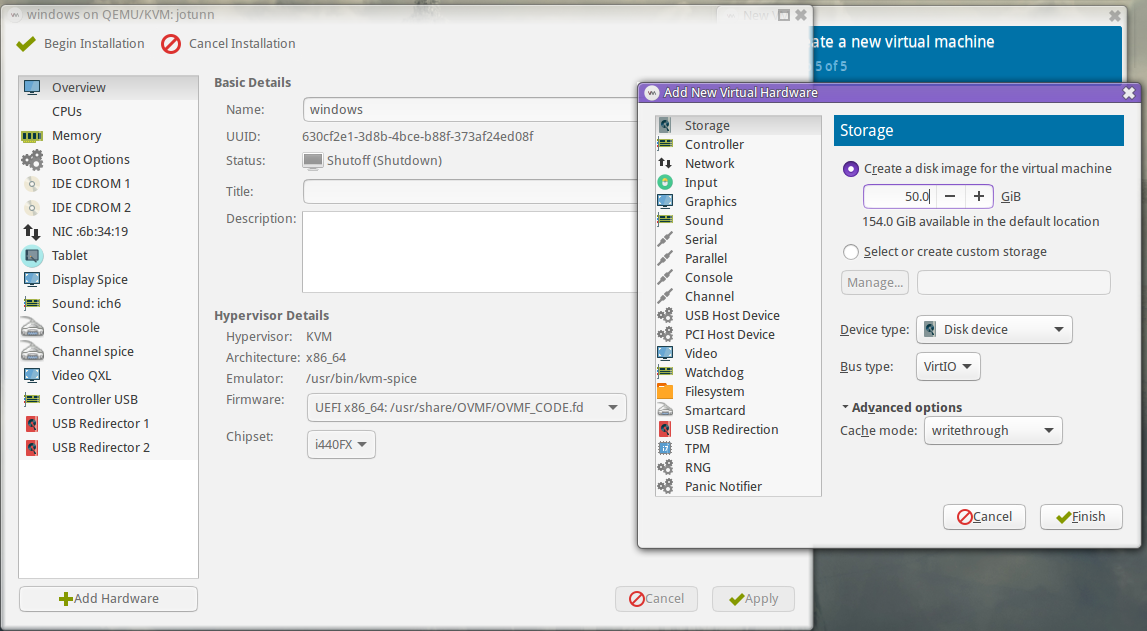
- If you haven't already added a storage device, click Add Hardware to do so now. I would recommend using VirtIO as the bus type for best performance. You may also wish to change the cache mode to writethrough, as your guest is likely going to be doing its own caching.
Check here for an example libvirt XML configuration for OS installation phase.
The Windows libvirt drivers are supplied by RedHat and can be found over at the Fedora wiki: Windows Virtio Drivers. Unless you run into problems, you'll most likely want to choose the stable drivers.
Now we are ready to start the installation— click the Begin Installation button at the top-left. If you need to modify your XML manually (for example, to use a raw block device for storage), then you will still click the Begin Installation button, then immediately stop the VM. This will allow the VM Creation Wizard to save your VM configuration.

If installing Windows and you miss the 'Press any key to boot from CD/DVD...' prompt, then you'll be dumped into OVMF's UEFI shell. The easiest thing to do is just reboot again, or you can navigate to the UEFI binary from the shell.
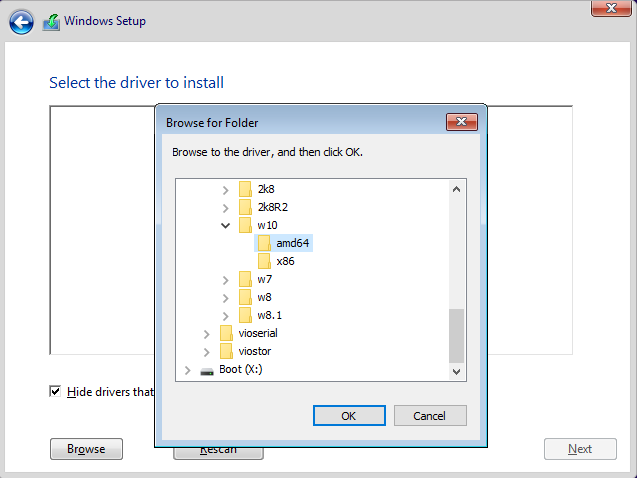
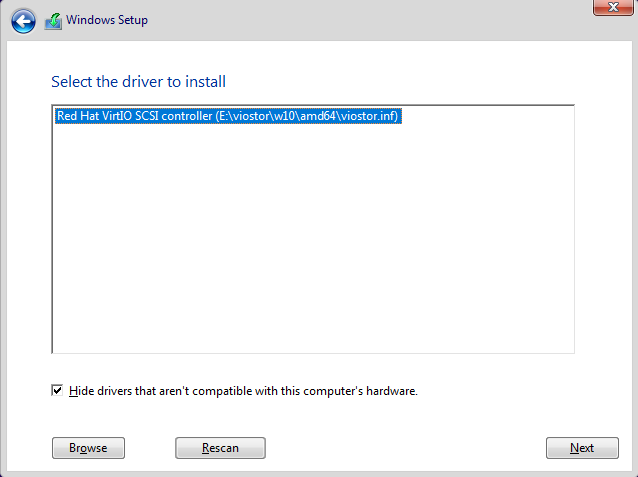
If you're installing Windows and using a VirtIO disk, you'll be greeted with an empty list of disks to choose from. This is where the VirtIO iso from RedHat/Fedora comes into play.

Click the Load Driver button. Setup will complain that it couldn't find any compatible driver, but that's OK. Click Browse in the lower-left, then navigate to the appropriate directory for your OS. For Windows 10, this was E:\viostor\w10\amd64.
Final Passthrough Setup
After completing OS installation using Spice or VNC, power down the VM so that the final adjustments can be made.
Remove Unnecessary Devices
First, remove any of the following devices from your VM configuration, if they exist:
- Display Spice
- Video Spice/QXL/VNC
- Channel spice
- Tablet
- Mouse
- USB Redirector (Type: SpiceVMC)
The IDE CDROM device created for the Windows ISO can be removed, however, leave the device associated with the RedHad VirtIO drivers connected, as we'll use it later to install additional drivers.
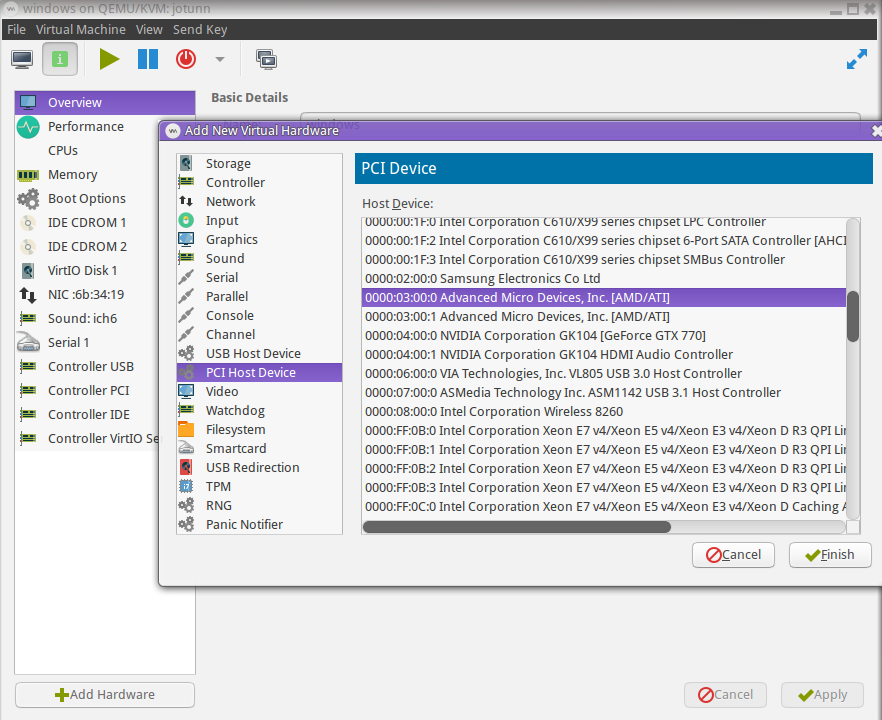
Add Guest Video Card
If using virt-manager, click the Add Hardware button, then choose PCI Host Device from the list. This will present you with a list of all of the devices on your PCI bus, similar to what you'd see from lspci. Most modern video cards will have a function for video (typically .0), and a function for audio (typically .1). Be sure to add both devices.
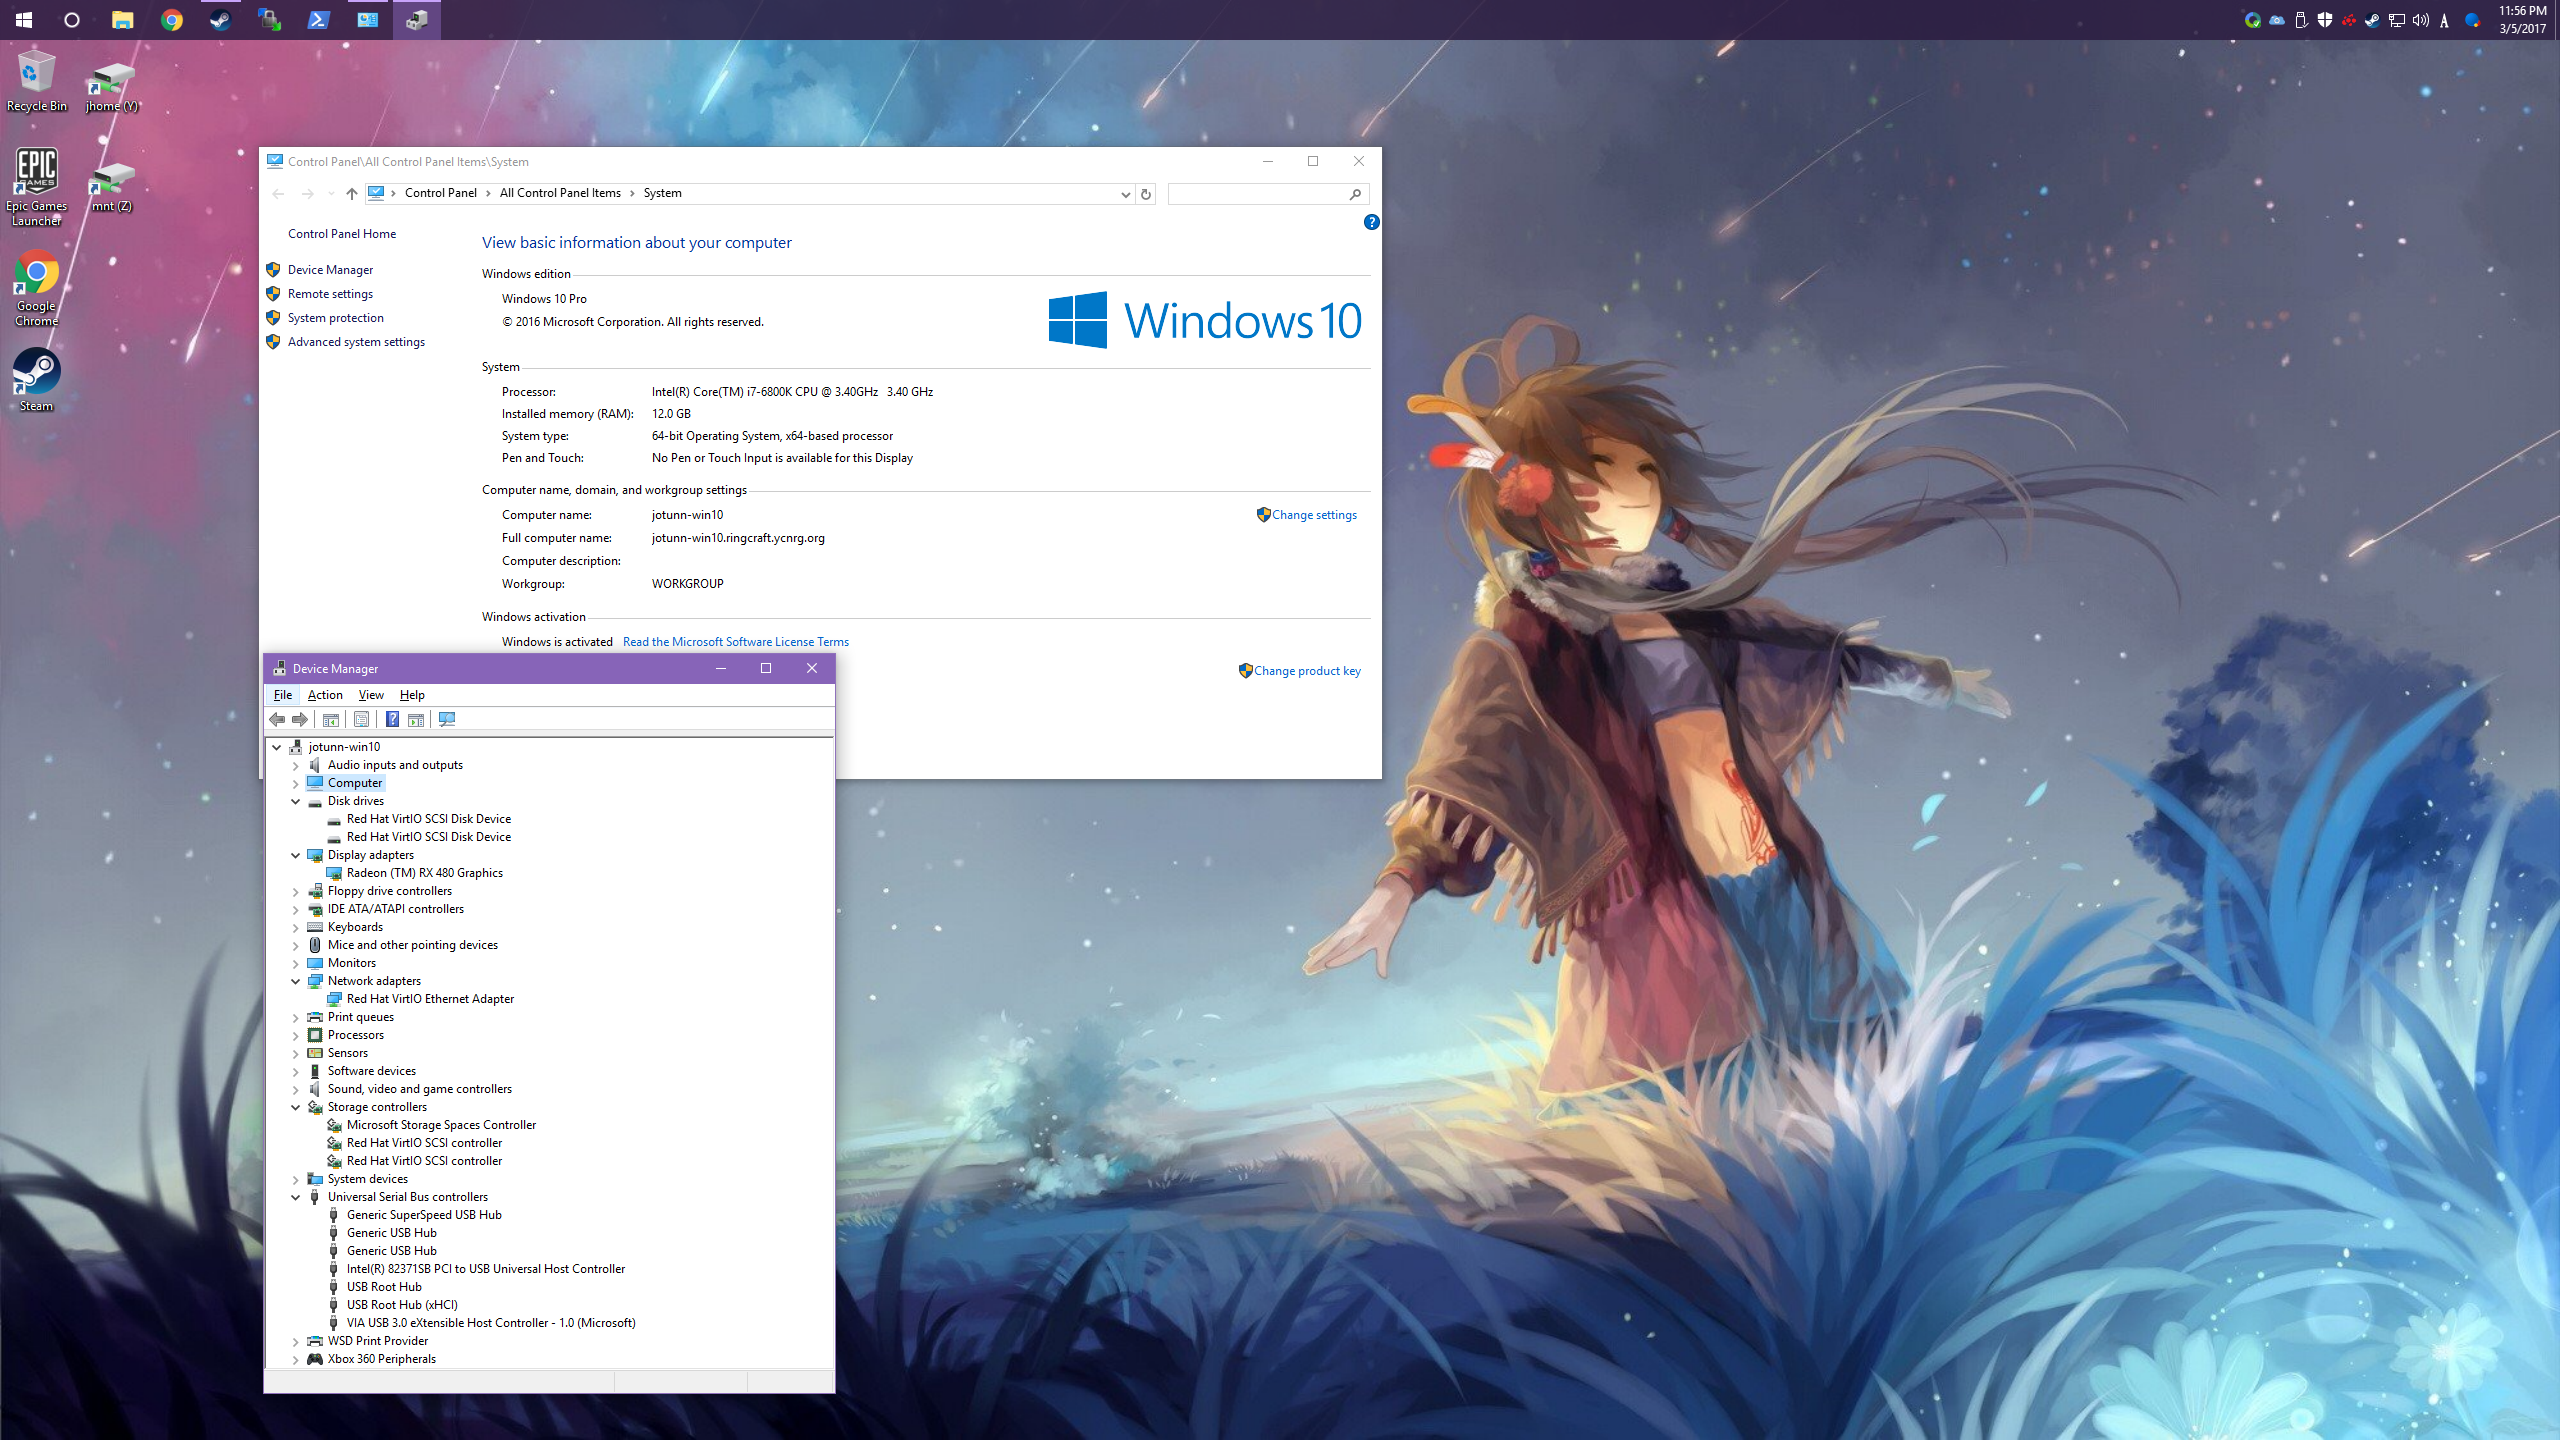
In the screenshot, the Video and Audio functions associated with the AMD RX480 can be seen on my machine.
Configure Guest USB
You will also need a way to interact with your VM. While sharing your existing mouse and keyboard is possible, it is not recommended, since you won't be able to shut your machine down locally or troubleshoot if something goes wrong.
On my machine, I have a KVM switch that connects to the guest and host (obviously, both USB ports are going to be physically on the same machine-- this might make more sense later). This setup allows me to pass input directly to the guest for initial setup, troubleshooting, as well as gaming. For everything else, a program such as Synergy can be used (you'll still need a keyboard/mouse connected before you get that working, though).
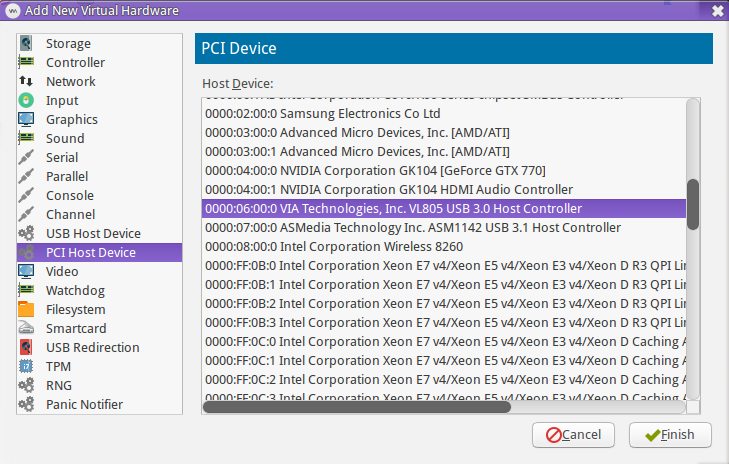
Option 1: (Best option, in my opinion) Use PCI passthrough to give the guest an entire USB bus. This has a few advantages: 1) Allows hotplugging devices while the guest is running, 2) No need to map devices by USB IDs or ports (which can change), 3) Lowest latency. The main disadvantage is that you'll need to determine which physical USB ports map to which USB bus. On my motherboard, even though it has 22 USB ports, most of those ports are on the same USB bus. Thankfully, it does have 4 ports (all grouped together nicely) on the back, which are on their own bus. This may or may not be a viable option, depending on your motherboard and the USB connectivity needs of the host. See the Additional Tweaks: USB Mapping section for more information.
Once you've determined the PCI device associated with the USB bus you'd like to passthrough, add a new PCI Host Device in virt-manager. In the example screenshot below, I will be passing through the VIA VL805 controller, which is mapped to 4 ports on the back of my motherboard, as I mentioned earlier.
Note that we don't need to stub-out the USB bus in question. In fact, this would be quite difficult, since the USB driver is typically a module statically built into the kernel, and is one of the very first modules initialized (would require a custom kernel build, and in the end, wouldn't be very useful). When your host first starts, all devices will associate with the host. When the guest starts, all devices will "disconnect" from the host, and PCI device will be available for the guest. On shutdown of the guest, the devices will reconnect to the host. If this is a problem for your setup, udev rules can be used to 'blacklist' single devices, or you can blacklist entire modules-- just be sure they aren't being used by anything the host needs!
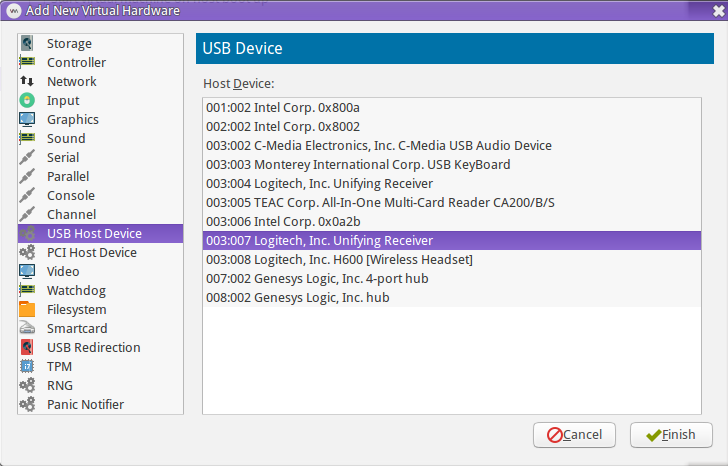
Option 2: Use USB passthrough to provide the guest access to individual USB devices. The main advantage of this option is that it's usually super easy to set up. One drawback is that the KVM switch option I mentioned earlier will not work with this method (since the USB device needs to exist at the time the VM is started in order to pass it through). Additionally, this incurs additional overhead on the host, and increases latency (not really an issue for HID devices like keyboards/mice, but is definitely an issue for anything that requires timely isochronous transfers, like USB audio).
In virt-manager, click Add Hardware, then select USB Host Device. This will provide a list of devices, similar to the output of lsusb. You may notice in the screenshot that there are two identical Logitech devices. When this happens, virt-manager will automatically include the bus location in the configuration. However, this location can (and usually does) change between host reboots.
Booting up!
Once everything is configured to your liking, it's time to boot the VM! Make sure you have a usable input device as discussed above, then start it up. The video below is a quick demo of starting the VM on my machine. Towards the end of the video, you can hear the Windows "USB disconnect" sound as I hit my KVM's foot-pedal to switch input back to the host.
Sample libvirt domain XML: For reference, the libvirt configuration I used can be found here. This also demonstrates how to passthrough entire SSDs or single partitions.
Guest Driver Installation
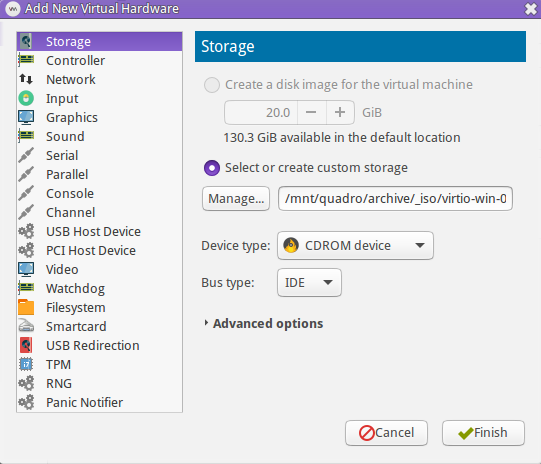
Now that the guest OS has booted up, it's time to setup the VirtIO drivers. If you're using Linux, this is done automatically. On Windows, we'll use the ISO that was mounted previously. This is required if you've decided to use the VirtIO Network Adapter (less host overhead, better performance) rather than an emulated adapter.
Here's a recap in case you skipped over this before, or no longer have the ISO mounted. Create a new Storage device, change the device type to CDROM, then select the virtio-win ISO.
Ethernet Driver
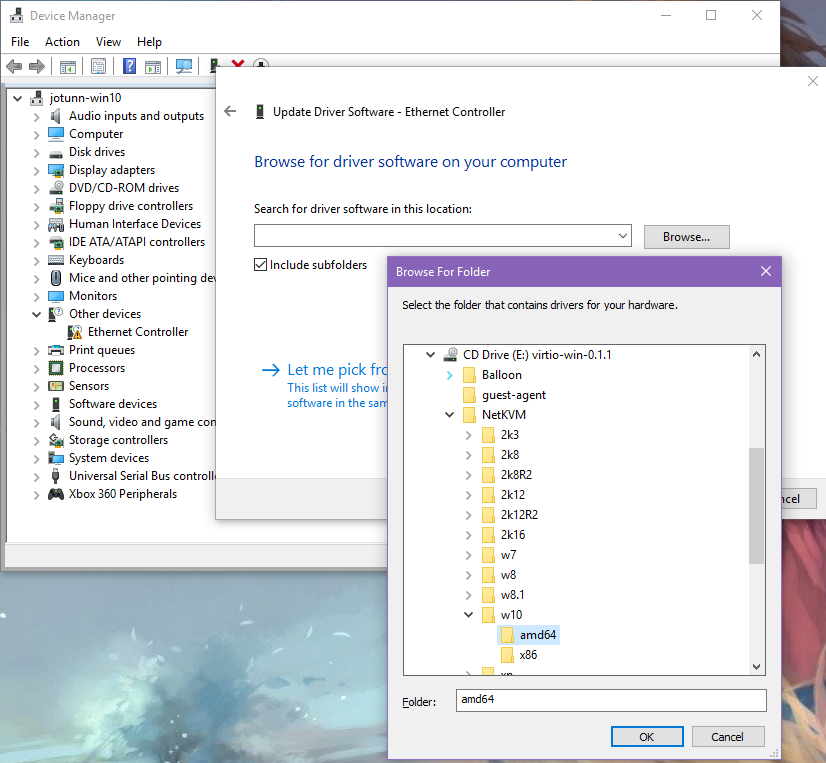
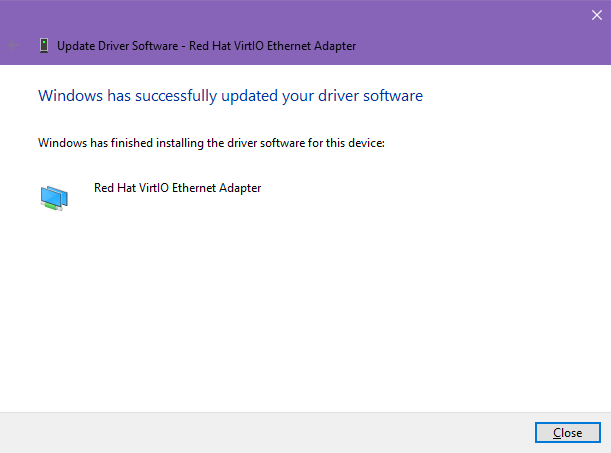
After Windows has booted up, open up the Device Manager, and you should spot an unknown Ethernet Controller in the Other devices section. Right click on the Ethernet Controller, then choose Update Driver Software. Then when prompted, select Browse my computer for driver software. You can then click Browse... to navigate to the correct directory for your version of Windows. The VirtIO Ethernet driver is under the NetKVM directory. Once expanded, select the directory corresponding to your guest OS, then choose the architecture (amd64 for 64-bit, x86 for 32-bit).
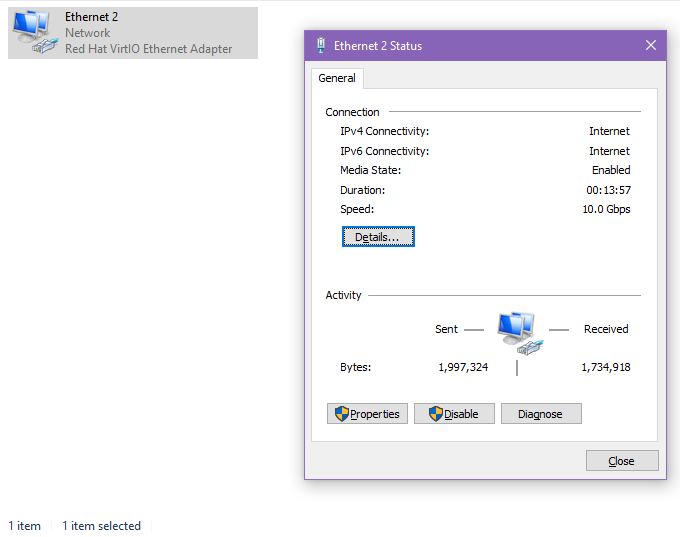
Once completed, the new network adapter should pop into your Network Adapters section, and can be configured. The current version of the driver should provide you with a 10Gbps connection.
Balloon Driver
After installing the Ethernet driver, you can also install the VirtIO Balloon driver. While this is optional, you might as well do it since you've already got the ISO mounted and you're in the Device Manager! This will allow the Windows guest to dynamically expand and relinquish portions of memory as needed.
The balloon interface will show up as an Unknown device under Other devices. Right click, select Update driver software.. and follow the same steps that were done for the Ethernet driver. This time, you'll expand the balloon folder, then choose the correct OS and Arch.
If you added any other custom VirtIO devices, you can install them via the same method (such as serial ports).
Storage Driver
The VirtIO SCSI driver should already be installed if you followed the Load Driver process during installation.
Video & Misc Drivers
Now that your network interface is (hopefully) working, you can take the time to install the latest drivers for your passthrough VGA card. Other than that, you shouldn't really need to install any other drivers, unless you've attached or passed through obscure hardware.
Additional Tweaks
Hopefully your guest OS is now fully up & running— maybe with a few kinks to work out (for me, audio was a pain in the ass to get working, while video worked flawlessly the first time). I've outlined below a few additional tweaks, as well as some alternative methods that can be used.
USB Controller Passthrough
As explained in the setup section, passing through an entire USB bus is (in my opinion) the best option for USB connectivity. It allows hotplugging to be handled by the guest OS, there's no need to worry about device mapping when booting your guest, and it also helps reduce host overhead and latency.
The downside: Which ports map to which bus? For my motherboard, I created this Google Docs spreadsheet to help me map out the ports on my board (my motherboard has 22 USB ports!).
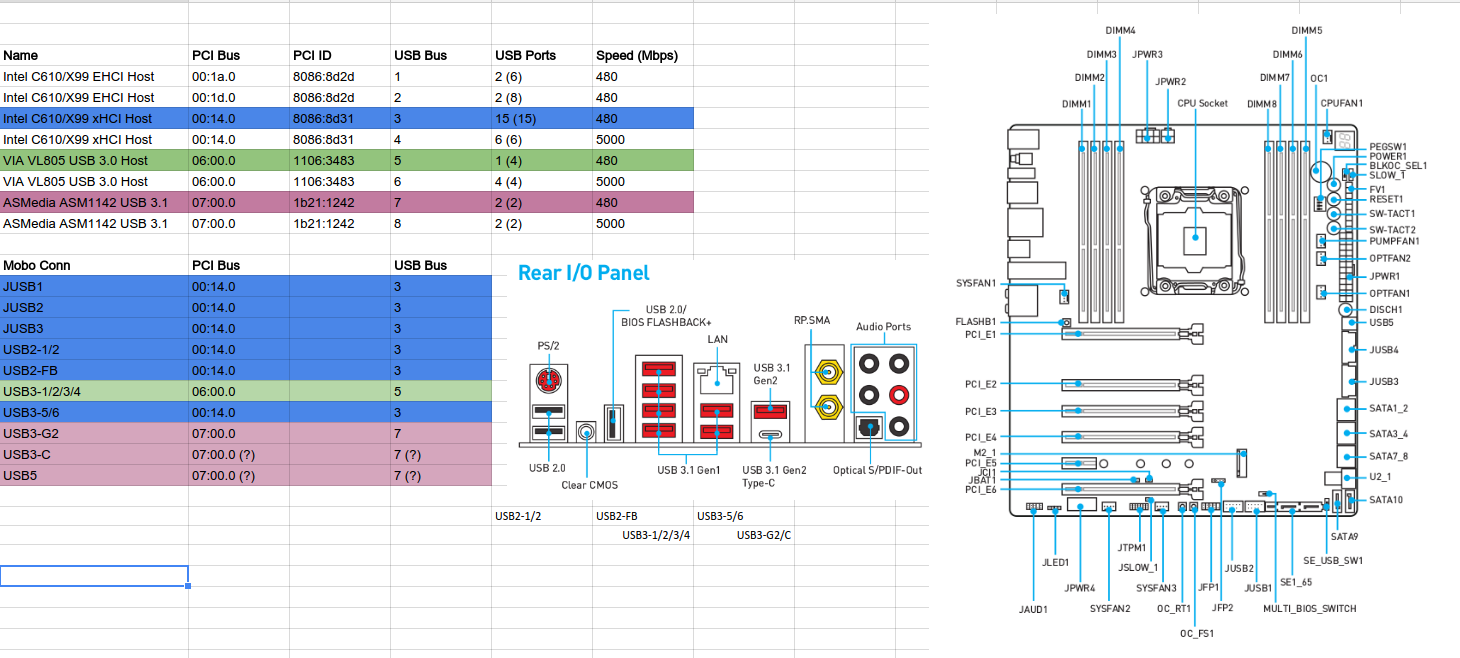
To make things a bit easier, I wrote a simple (nasty) Bash one-liner that will enumerate all of a machine's USB devices, showing which USB bus they are connected to, and the PCI bus location of each USB controller, as well as the corresponding VID:PID combos for both buses.
echo -en "\n USB BUS [PCI BUS] -- DESCRIPTION [PCI VID:PID]\n\tDEVICE NUM: USB VID:PID DESCRIPTION\n"; for upath in /sys/bus/pci/devices/0000:*/usb*; do arx=($(echo "$upath" | perl -ne '/^.+0000:(.+)\/usb([0-9]+)$/ && print "$1 $2"')); loc=${arx[0]}; bus=${arx[1]}; hname=$(lspci -nn | grep "^$loc" | awk -F: '{print $3 ":" $4}'); echo "** Bus ${bus} [${loc}] -- ${hname}"; lsusb -s "${bus}:" | sed 's/^Bus ..../\t/' | sort -n ; done
For example, here is (abbreviated) output from my machine:
 USB BUS [PCI BUS] -- DESCRIPTION [PCI VID:PID]
    DEVICE NUM: USB VID:PID DESCRIPTION
** Bus 3 [00:14.0] --  Intel Corporation C610/X99 series chipset USB xHCI Host Controller [8086:8d31] (rev 05)
    Device 001: ID 1d6b:0002 Linux Foundation 2.0 root hub
    Device 002: ID 0d8c:0008 C-Media Electronics, Inc.
    Device 005: ID 0644:0200 TEAC Corp. All-In-One Multi-Card Reader CA200/B/S
    Device 006: ID 8087:0a2b Intel Corp.
    Device 007: ID 046d:c52b Logitech, Inc. Unifying Receiver
    Device 024: ID 046d:0a29 Logitech, Inc. H600 [Wireless Headset]
    Device 039: ID 0566:3055 Monterey International Corp.
    Device 040: ID 046d:c52b Logitech, Inc. Unifying Receiver
** Bus 4 [00:14.0] --  Intel Corporation C610/X99 series chipset USB xHCI Host Controller [8086:8d31] (rev 05)
    Device 001: ID 1d6b:0003 Linux Foundation 3.0 root hub
** Bus 1 [00:1a.0] --  Intel Corporation C610/X99 series chipset USB Enhanced Host Controller #2 [8086:8d2d] (rev 05)
    Device 001: ID 1d6b:0002 Linux Foundation 2.0 root hub
    Device 002: ID 8087:800a Intel Corp.
If you have a lot of devices plugged in, this may give you a pretty good idea of how things might be laid out. If not, you can use something like a phone/tablet or USB thumb drive, and plug it into each port of your computer— making note which bus that port is connected to each time you plug the device in.
Once you've mapped out which ports belong to which bus, you can then check the output from the one-liner above (or lspci -nn) and use the corresponding PCI VID/PID when adding a new PCI Host Device to your virtual machine.
As noted before, there's no need to stub-out the USB controller, since all devices will be gracefully disconnected prior to handoff from the host to guest VM. As a consequence of this, devices attached at startup will first be initialzed by the host until the time when the guest machine starts and takes control of the USB controller.
Raw Block Devices with VirtIO
Rather than using QCOW2 (default) or LVM2 as a backing store for your new VM, an entire SSD (or partition from an SSD can be used instead). The primary advantage of doing this is to allow the disk to be directly accessed from other operating systems if you ever needed to dual-boot or place the drive in another machine. It also bypasses the OS's filesystem layer by directly accessing the device, although the performance gains from doing this are likely minimal.
This will need to be done by manually editing the domain XML definition. Examples of two possible scenarios are shown below from my setup.
It's best to use the /dev/disk/by-id path rather than /dev/sdX, as this can change when your machine is rebooted for various reasons. The cache value should be set to 'none', as the guest operating system will provide its own caching.
Passing through an entire disk:
<disk type='block' device='disk'>
  <driver name='qemu' type='raw' cache='none'/>
  <source dev='/dev/disk/by-id/ata-M4-CT128M4SSD2_00000000113303180B16'/>
  <backingStore/>
  <target dev='vda' bus='virtio'/>
  <boot order='1'/>
</disk>
Passing through a single partition:
<disk type='block' device='disk'>
  <driver name='qemu' type='raw' cache='none'/>
  <source dev='/dev/disk/by-id/nvme-Samsung_SSD_960_EVO_500GB_S3EUNX0HB09470T-part3'/>
  <backingStore/>
  <target dev='vdb' bus='virtio'/>
</disk>
More information:
- Adding Hard Drives and Other Block Devices to a Guest
Benchmarks
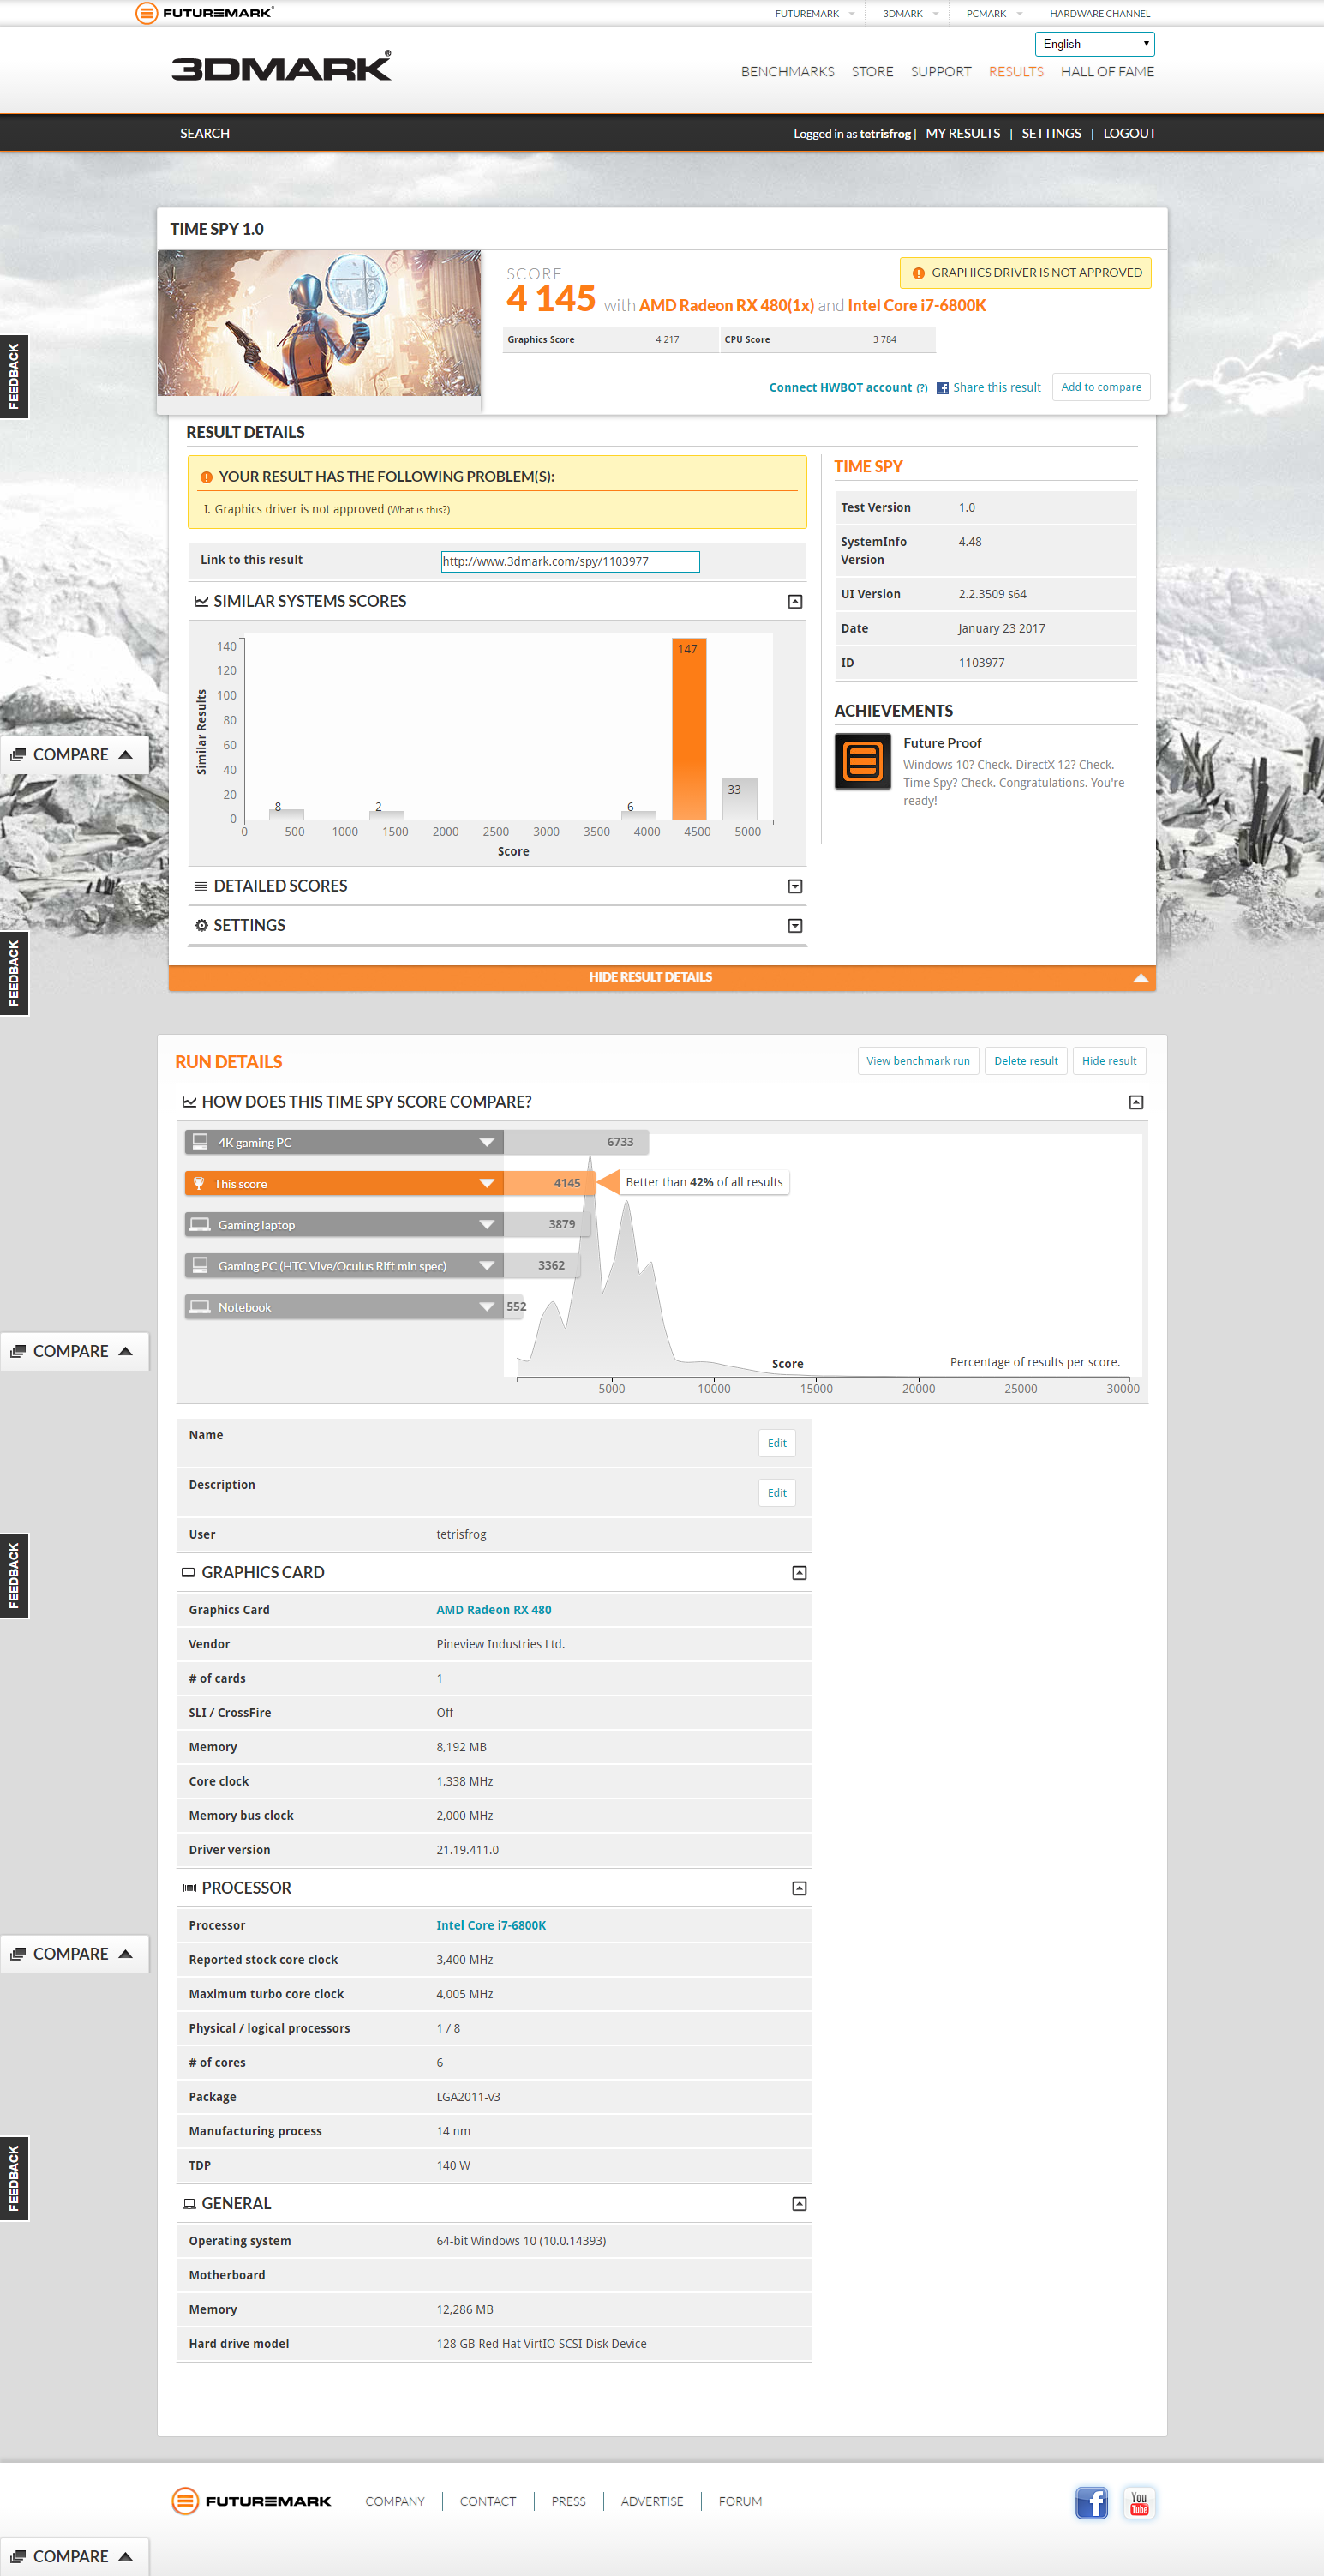 3DMark 2016: Time Spy demo, with AMD Radeon beta driver
 3DMark 2016: Fire Strike demo, with AMD Radeon release (official) driver
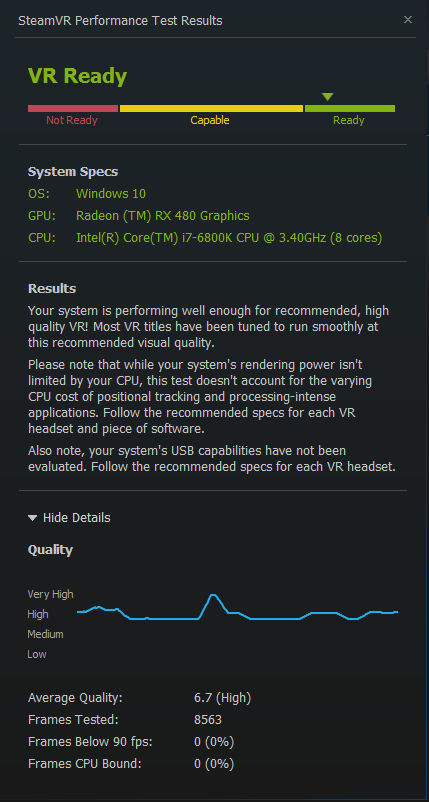
SteamVR Readiness Test: with AMD Radeon release (official) driver
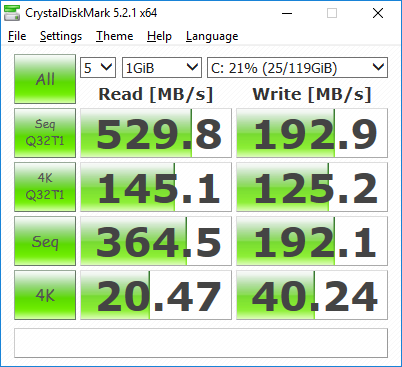
CrystalDiskMark results: VirtIO SCSI storage - Crucial M4 128GB SATA3 SSD (raw block, device)
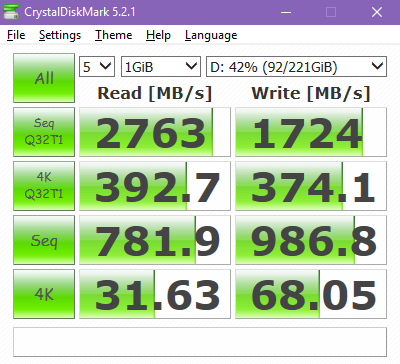
CrystalDiskMark results: VirtIO SCSI storage - Samsung 960 EVO NVMe SSD (raw block, partition)
References & Additional Resources
- VFIO Tips & Tricks, Alex Williamson
- PCI passthrough via OVMF, ArchLinux Wiki
- Hyper-V Enhancements for Windows 10 in KVM, Cole Robinson
- GPU Passthrough with QEMU on Arch Linux, DominicM
- GPU Passthrough via vfio-pci with KVM on Ubuntu 15.04, Rachel Chen
- Using GPUs in KVM Virtual Machines, ArrayFire
- KVM VGA-Passthrough using the new vfio-vga support in kernel =>3.9, ArchLinux BBS
- KVM VGA Passthrough Database (Google Docs spreadsheet)