Xen 4.4: Installing PV OS from an ISO image
This article covers creating a DomU on Xen 4.4 by installation of an OS from its native install media (typically an ISO image), first as an HVM domain during installation, then converting to a PV domain after installation is complete. To demonstrate, we setup a paravirtualized CentOS 7 (64-bit) domain.
For many candidate DomU distributions, installation via the xen-tools xen-create-image (eg. with debootstrap, rinse, etc.) is not easy to accomplish. This works great for Debian, Ubuntu, and CentOS 5 — but other OSes takes a bit of work, or may not be easily possible without installation from its original media.
Here, we will look at installing an operating system on to a Xen domain by first creating an HVM-based domain which will run during our install of the OS. Then, once installation is completed, we can convert the domain to boot via PyGrub so that it can benefit from the increased speed that comes with paravirtualization (PV) over full hardware virtualization (HVM).
This article looks at installing CentOS 7 (64-bit), but the process can be used for other OSes as well.
Here, I am using Xen 4.4 with the xl toolstack on a Debain 8 Dom0, but can be adjusted as needed for older versions of Xen, or if using the xm toolstack.
Creating an HVM DomU
Create logical volume for disk
-L60Gcreate 60GiB disk-nxr1-diskuse volume label xr1-diskvg0create volume in LVM group vg0
lvcreate -L60G -nxr1-disk vg0
Verify all is good with lvdisplay /dev/vg0/xr1-disk
Fetch installation media
- Select a nearby mirror from http://isoredirect.centos.org/centos/7/isos/x86_64/
mkdir -p /opt/iso
cd /opt/iso
wget http://mirror.solarvps.com/centos/7/isos/x86_64/CentOS-7-x86_64-Minimal-1503-01.iso
Create XL/XM config
Manually create config in /etc/xen/config.d/xr1.cfg (xr1 is our DomU hostname)
# Use HVM instead of PV
builder = "hvm"

# Set memory and vcpus as needed
memory = 4096
vcpus = 2

# Host/Domain name
name = "xr1"

# Setup bridged interface with Intel e1000
vif = [ 'type=ioemu, model=e1000, mac=00:16:3E:29:QQ:QQ, bridge=xenbr1' ]

# Disks - our LVM we just created & the installer ISO image
disk = [
        'phy:/dev/vg0/xr1-disk,xvda,rw',
        'file:/opt/iso/CentOS-7-x86_64-Minimal-1503-01.iso,xvdb:cdrom,r'
       ]

# Set boot order (d = CDROM, c = HDD)
boot = "dc"

# Use VESA-compliant display with more VRAM
vga = "stdvga"
videoram = 64

# Use VNC for display
vnc = 1
vnclisten  = "176.9.0.X"
vncdisplay = 0
vncpasswd  = "supersecret"
Boot the domain and begin OS installation
Start the DomU
xl create /etc/xen/config.d/xr1.cfg
Now connect via a VNC client to the vnclisten IP address on port 5900+vncdisplay (in this case, port 5900)
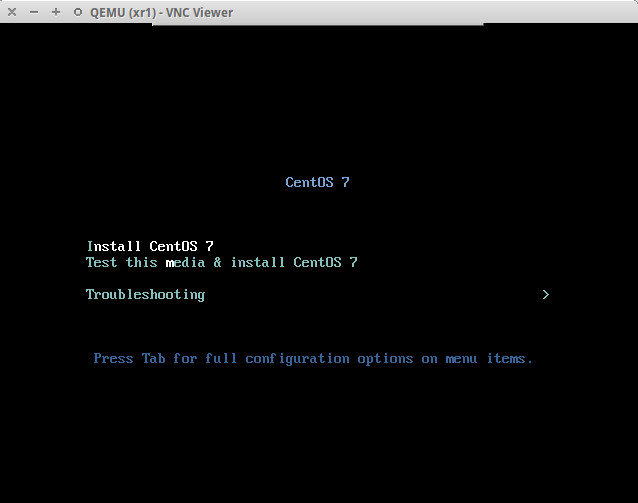
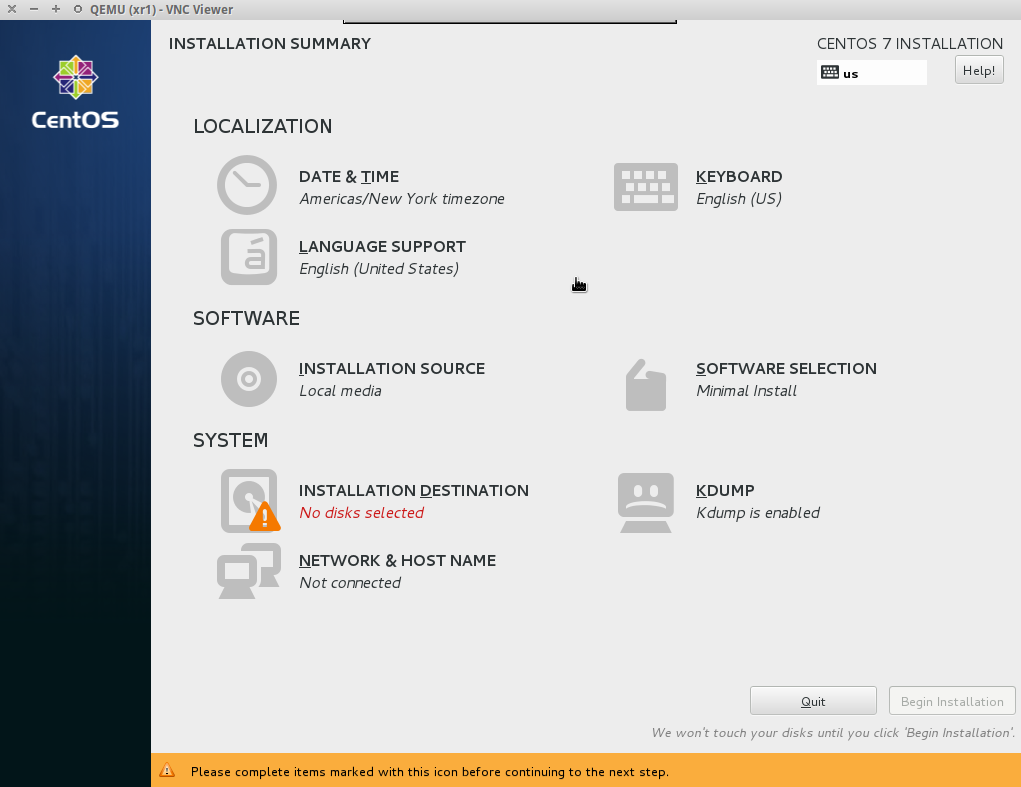
Now complete the installation steps. Go through the localization portions as needed, important bits outlined below:
- CentOS should auto-detect the installation media and display the installation source as Local media. If not, check to ensure the CDROM device is configured properly in the XM config file
- Choose Installation Destination icon and set up the partitions. Your disk should be displayed here, if it's not, destroy the domain and check the XM config to ensure your disk settings are correct. I created the following partitions...
- Create first partition, mounted on
/bootwith a size of 512MiB. Ensure partition type is set to ext3 - Create second partition, mounted on
/-- leave the size field empty to consume the remaining space. Set partition type to ext4 - Note that no swap space was created, as I do not want to use swap for this domain. It can be added later, though, by expanding the LV this DomU is using, then using
fdiskto create a swap partition on the extra space (I think this should be possible, but haven't actually tried it)
- Create first partition, mounted on
- Under Network & Host name, set your DomU's fully-qualified hostname and network settings. Note that in my configuration, this domain will ultimately be routed using the xenbr0:1 interface, but that won't work just yet. It can still be set though, so that when we reboot the DomU in paravirtualized mode, it should connect to the network without issues (and without having to use
xl consolehopefully)
Make sure to set a root password while the installation is proceeding. Then, once the install is complete, choose the Reboot option. This will probably cause the DomU to hang, but that's OK. Hop back over to Dom0 and kill it:
xl destroy xr1
(xr1 is the name of our DomU, as specified as name in the config file)
Booting in HVM mode
After the domain has been destroyed, edit the XM config file again, and comment-out or remove the installation media disk. The new disk and boot lines are shown below.
disk = [ 'phy:/dev/vg0/xr1-disk,xvda,rw' ]
boot = "c"
Now re-create the domain, and it should boot into our newly-installed OS.
xl create /etc/xen/config.d/xr1.cfg
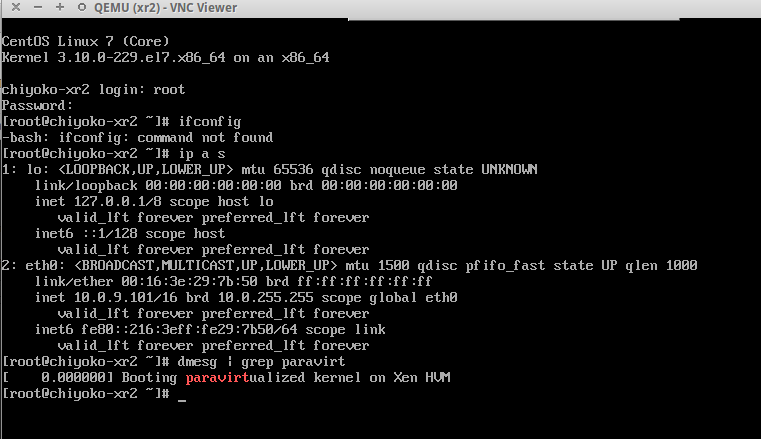
Once again, reconnect via VNC, and once booting is complete, you should be greeted by the login prompt! Go ahead and login as root using the password created during installation.
We then want to check the network settings to ensure that the domain will be properly configured when booting in PV mode, since Xen's console kinda sucks, and we won't have VNC access at that point. Also check to ensure the kernel supports paravirtualization, and also detects that it is being virtualized. To do this, run dmesg | grep paravirtual -- this should something like Booting paravirtualized kernel on Xen HVM. If so, we should be good to go. Go ahead and shutdown -h now. Then xl destroy xr1 from the hypervisor.
Booting in PV mode
Now, we will be converting the DomU from an HVM domain to a PV domain. This is to obtain much better I/O performance, as CentOS 7 has a paravirtualized Xen-aware kernel. First, move the old configuration out of the way:
mv /etc/xen/config.d/xr1.cfg /etc/xen/config.d/xr1-hvm.cfg
Then create a new config for booting into PV mode
# We will be using PyGrub as the bootloader
bootloader = "/usr/lib/xen-4.4/bin/pygrub"

# Set hostname, memory, vpcus, etc.
name = "xr1"
memory = 4096
vcpus = 2

# Use the same disk as used previously, with the same device name
disk = [ 'phy:/dev/vg0/xr1-disk,xvda,rw' ]

# Set up a proper routed network connection
vif = [ 'ip=176.9.XXX.XXX, mac=00:16:3E:29:QQ:QQ, gatewaydev=xenbr0:1' ]
Save the new configuration as /etc/xen/config.d/xr1.cfg, then start up the domain
xl create /etc/xen/config.d/xr1.cfg
If no errors were shown, it should have booted, as long as you didn't choose any exotic boot or partition type options during installation. We can now try ssh'ing to the newly created DomU with ssh xr1 or ssh 1.2.3.4.

Cloning & Provisioning
Now that you have set up one virtual machine, you can use this first image as a master to create others. This can be done by cloning the LVM volume (or image file), or by mounting the new DomU's disk locally (eg. to /mnt/xr1) so that you can create a tarball that can later be deployed with xen-create-image, which would also allow automatic setup of network parameters and copying of the skeleton directory (/etc/xen-tools/skel).