Xen 4.4: Windows HVM Networking
linux / xen / networking
Taking a look at the settings and steps required to successfully set up and configure networking on a Windows 7 or Windows Server HVM domain on Xen 4.4 hypervisor running Debian
Getting networking to work in Windows under Xen is not a straightforward task, it seems. Here are my notes while attempting to get a Windows 7 domain set up on a server with Hetzner.
The host machine has a subnet statically routed to it by Hetzner, so we can't use straight bridging, because Hetzner's switches would just drop the packets from an unknown MAC address. So here, we take a look at setting up a bridge and using NAT in iptables to bridge the traffic from an "internal" 10.0.9.101 address to the machine's "external" IP address, 176.9.22.223 -- this IP is dedicated to this Windows virtual machine. Note that this type of NAT is basic or one-to-one NAT, since one address directly translates to another-- there's no port forwarding or any other nonsense.
Preface
The xenbr1 is a virtual interface and bridge with an IP of 10.0.9.1. Configuration from /etc/network/interfaces shown below. We will be adding our Windows domain to this bridge later on.
auto xenbr1
iface xenbr1 inet static
  address   10.0.9.1
  broadcast 10.0.9.255
  netmask   255.255.255.0
  pre-up brctl addbr xenbr1
Set up on the client domain
Note that I could not get this to work at all with the Intel e1000 ioemu device on Windows 7 x64, but ymmv. I needed to install the GPLPV drivers to even be able to ping the dom0 host.
If you need to install the GPLPV drivers on a host machine without network access, try the following steps to create a new LVM volume that's formatted NTFS.
- Install ntfs-3g utils if they are not already installed.
apt-get install ntfs-3g
- Create a new 8GB logical volume 'winstrap' on group vg0. Format it as NTFS.
lvcreate -L8G -nwinstrap vg0
mkfs.ntfs /dev/vg0/winstrap
- Mount the volume so that we can put the drivers and things on it
mkdir /mnt/winstrap
mount /dev/vg0/winstrap /mnt/winstrap
- Download the .NET 4.5 Redist package (required for the Xen Shutdown driver to work) and the latest GPLPV drivers. Here we are downloading the GPLPV drivers for 64-bit Windows; adjust as needed.
cd /mnt/winstrap
wget http://download.microsoft.com/download/1/6/7/167F0D79-9317-48AE-AEDB-17120579F8E2/NDP451-KB2858728-x86-x64-AllOS-ENU.exe
wget http://apt.univention.de/download/addons/gplpv-drivers/gplpv_Vista2008x64_signed_0.11.0.373.msi
Check this page for signed up-to-date GPLPV drivers from Univention, as well as downloads for older versions of Windows and 32-bit OSes
Now that everything is ready, unmount our little bootstrapper volume, and add it to your domain's config as an additional disk.
- Unmount the winstrap volume
umount /mnt/winstrap
- Edit the
diskline in the domain's XM config to include the winstrap volume (in addition to the primary disk, of course)
'phy:/dev/vg0/winstrap,xvdc,rw'
- Now boot your domain, Windows should have mounted the raw NTFS volume as drive (D:) or some such (thankfully it doesn't care that there isn't a partition table). First install the .NET framework. Do not reboot. Then install the Xen GPLPV drivers, and reboot when prompted. After the machine reboots, it may ask to reboot again, so go ahead and shutdown, but this time destroy the machine so that we can edit its config.
- At this point, remove any references to ioemu devices in the domain's XM config. Your
vifline should look similar to the following:
vif = [ 'mac=00:16:3E:29:7B:51, bridge=xenbr1' ]
Windows network settings
Once the Xen Network Adapter is available, configure the following settings for IPv4. Substitute with your own settings where applicable.
- Address: 10.0.9.101 (should be on the same subnet as xenbr1)
- Netmask: 255.255.255.0
- Gateway: Same gateway as the Dom0 host
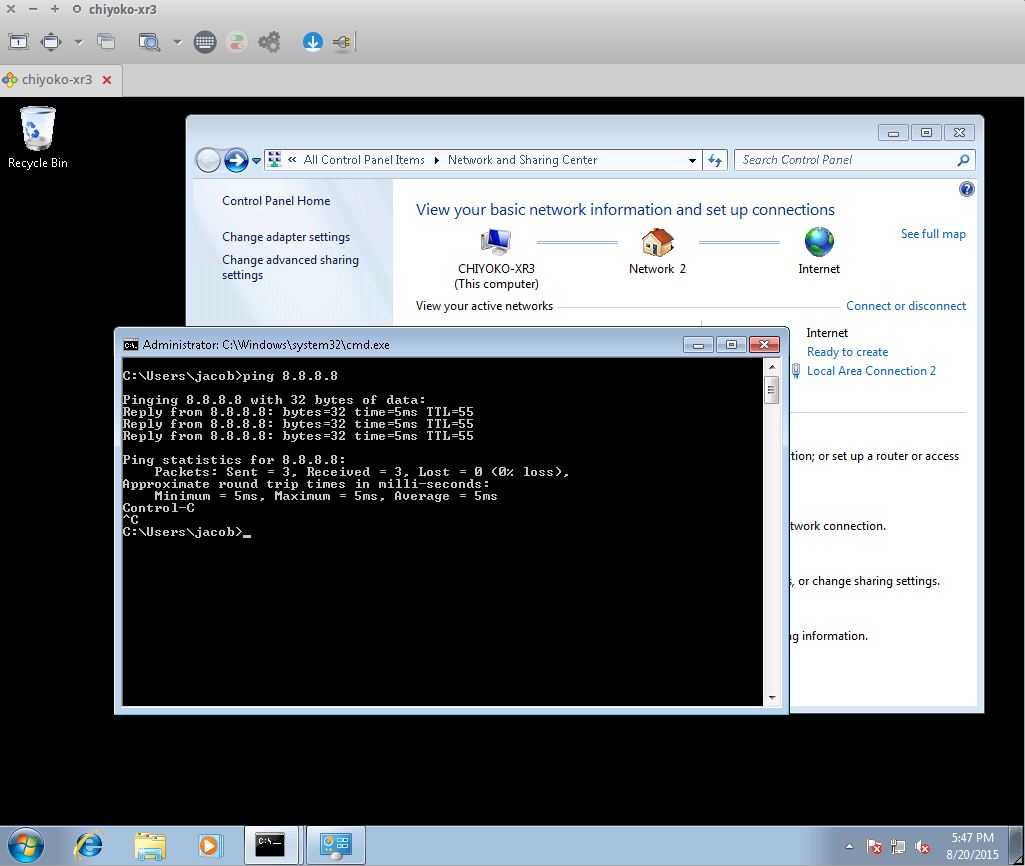
- DNS resolvers: Use your ISP's DNS resolvers or Google DNS (8.8.8.8, 8.8.4.4)
Host network settings
Bridge interfaces
Add the domain's interface, named vifXX.0 (where XX is the domain ID, run xl list to check, or better yet xl network-list DOMNAME). xenbr1 is a secondary interface with an IP address of 10.0.9.1 in this case. This should probably be implemented as a vif script or something, so that it doesn't need to be done or undone everytime the machine is created or destroyed.
brctl addif xenbr1 vifXX.0
Once you have destroyed the domain, its interface will be removed, and will in turn be removed from the bridge configuration. Keep this in mind when recreating the domain again.
Set up forwarding rules in iptables
Forwards incoming traffic on 176.9.22.223 to 10.0.9.103 on the xenbr1 bridge. Outbound traffic from the Windows domain (10.0.9.103) will have its source address rewritten as 176.9.22.223 so that the remote host can actually send a response and make its way back here. Intra-machine traffic to other domains (routed or bridge) still works as expected.
iptables -t nat -A PREROUTING -d 176.9.22.223 -j DNAT --to 10.0.9.103
iptables -t nat -A POSTROUTING -s 10.0.9.103 -d 176.9.22.223 -j MASQUERADE
iptables -t nat -A POSTROUTING -s 10.0.9.103 -j SNAT --to-source 176.9.22.223
Conclusion
After this, you should be able access the domain just as if it were directly connected to your main interface, eth0 or similar, with both ingress and egress traffic being directly forwarded. There is probably a more elegant solution for this, but this seems to work, at least for my set up.